Isolate Azure AD risky users
Azure Active Directory (AD) calculates a user’s risk level based on the probability that their account has been compromised. With Cloudflare Zero Trust, you can synchronize the Azure AD risky users list with Cloudflare Access and apply more stringent Zero Trust policies to users at higher risk.
This tutorial demonstrates how to automatically redirect users to a remote browser when they are deemed risky by Azure.
Time to complete:
1 hour
Prerequisites
- Azure AD Premium P2 license
- Cloudflare Browser Isolation add-on
- Gateway HTTP filtering enabled on your devices
- (Recommended)
wranglerinstallation
1. Set up Azure AD as an identity provider
Refer to our IdP setup instructions for Azure AD.
2. Add Azure AD API permissions
Once the base IdP integration is tested and working, enable additional permissions that will allow a script to create and update risky user groups in Azure AD:
In Azure Active Directory, go to App registrations.
Select the application you created for the IdP integration.
Go to API permissions and select Add a permission.
Select Microsoft Graph.
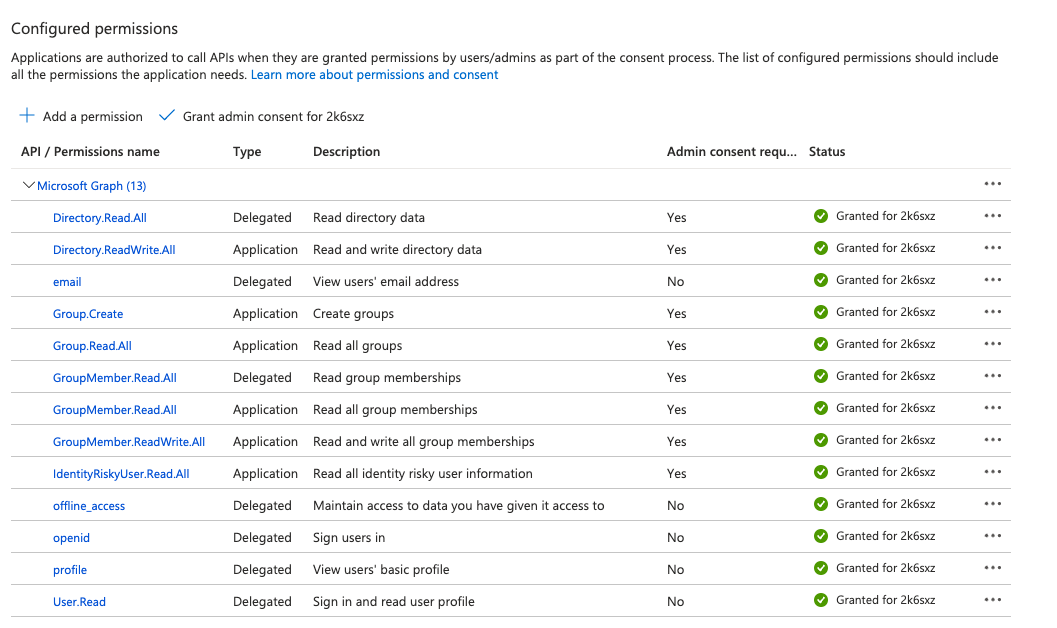
Select Application permissions and add the following permissions:
IdentityRiskyUser.ReadAllDirectory.ReadWriteAllGroup.CreateGroup.ReadAllGroupMember.ReadAllGroupMember.ReadWriteAll
Select Grant admin consent.
You will see the list of enabled permissions.

3. Add risky users to Azure AD group
Next, configure an automated script that will populate an Azure AD security group with risky users.
To get started quickly, deploy our example Cloudflare Workers script by following the step-by-step instructions below. Alternatively, you can implement the script using Azure Functions or any other tool.
Authenticate
wrangler.$ wrangler loginOpen a terminal and clone our example project.
$ wrangler generate risky-users https://github.com/cloudflare/msft-risky-user-ad-syncGo to the project directory.
$ cd risky-usersModify
wrangler.tomlto include the following values:<ACCOUNT_ID>: your Cloudflare account ID.<TENANT_ID>: your Azure AD Directory (tenant) ID, obtained when setting up Azure AD as an identity provider.<CLIENT_ID>: your Azure AD Application (client) ID, obtained when setting up Azure AD as an identity provider.
wrangler.toml
name = "risky-users"compatibility_date = "2023-01-04"main = "src/index.js"workers_dev = falseaccount_id = "<ACCOUNT-ID>"[vars]AZURE_AD_TENANT_ID = "<TENANT-ID>"AZURE_AD_CLIENT_ID = "<CLIENT-ID>"[triggers]crons = ["* * * * *"]
Deploy the Worker to Cloudflare’s global network.
$ npx wrangler deployCreate a secret variable named
AZURE_AD_CLIENT_SECRET.$ wrangler secret put AZURE_AD_CLIENT_SECRETYou will be prompted to input the secret’s value. Enter the Client secret obtained when setting up AzureAD as an identity provider.
The Worker script will begin executing once per minute. To view realtime logs, run the following command and wait for the script to execute:
$ wrangler tail --format pretty
After the initial run, the auto-generated groups will appear in the Azure AD dashboard.

4. Synchronize risky user groups
Next, synchronize Azure AD risky user groups with Cloudflare Access:
In Azure AD, assign the following groups to your SCIM enterprise application:
IdentityProtection-RiskyUser-RiskLevel-highIdentityProtection-RiskyUser-RiskLevel-mediumIdentityProtection-RiskyUser-RiskLevel-low
Cloudflare Access will now synchronize changes in group membership with Azure AD. You can verify the synchronization status on the SCIM application’s Provisioning page.
5. Create a browser isolation policy
Finally, create a Gateway HTTP policy to isolate traffic for risky user groups.
In Zero Trust, go to Gateway > Firewall Policies > HTTP.
Select Add a policy.
Build an Isolate policy that contains a User Group Names rule. For example, the following policy serves
app1.example.comandapp2.example.comin a remote browser for all members flagged as high risk:Selector Operator Value Logic Action Domain in app1.example.com,app2.example.comAnd Isolate User Group Names in IdentityProtection-RiskyUser-RiskLevel-high
To test the policy, refer to the Microsoft documentation for simulating risky detections.