Add a React form with Formspree
Almost every React website needs a form to collect user data. Formspree is a back-end service that handles form processing and storage, allowing developers to include forms on their website without writing server-side code or functions.
In this tutorial, you will create a <form> component using React and add it to a single page application built with create-react-app. Though you are using create-react-app (CRA), the concepts will apply to any React framework including Next.js, Gatsby, and more. You will use Formspree to collect the submitted data and send out email notifications when new submissions arrive, without requiring any server-side coding.
You will deploy your site to Cloudflare Pages. Refer to the Get started guide to familiarize yourself with the platform.
Setup
To begin, create a new React project on your local machine with create-react-app. Then create a new GitHub repository, and attach the GitHub location as a remote destination:
# create new project with create-react-app
$ npx create-react-app new-app
# enter new directory
$ cd new-app
# attach git remote
$ git remote add origin git@github.com:<username>/<repo>.git
# change default branch name
$ git branch -M main
You may now modify the React application in the new-app directory you created.
The front-end code
The starting point for create-react-app includes a simple Hello World website. You will be adding a Contact Us form that accepts a name, email address, and message. The form code is adapted from the HTML Forms tutorial. For a more in-depth explanation of how HTML forms work and additional learning resources, refer to the HTML Forms tutorial.
First, create a new react component called ContactForm.js and place it in the src folder alongside App.js.
project-root/
├─ package.json
└─ src/
   ├─ ContactForm.js
   ├─ App.js
   └─ ...
Next, you will build the form component using a helper library from Formspree, @formspree/react. This library contains a useForm hook to simplify the process of handling form submission events and managing form state.
Install it with:
$ npm install --save @formspree/react
Then paste the following code snippet into the ContactForm.js file:
import { useForm, ValidationError } from '@formspree/react';

export default function ContactForm() {  const [state, handleSubmit] = useForm('YOUR_FORM_ID');
  if (state.succeeded) {    return <p>Thanks for your submission!</p>;  }
  return (    <form method="POST" onSubmit={handleSubmit}>      <label htmlFor="name">Full Name</label>      <input id="name" type="text" name="name" required />      <ValidationError prefix="Name" field="name" errors={state.errors} />
      <label htmlFor="email">Email Address</label>      <input id="email" type="email" name="email" required />      <ValidationError prefix="Email" field="email" errors={state.errors} />
      <label htmlFor="message">Message</label>      <textarea id="message" name="message" required></textarea>      <ValidationError prefix="Message" field="message" errors={state.errors} />
      <button type="submit" disabled={state.submitting}>        Submit      </button>      <ValidationError errors={state.errors} />    </form>  );
}
Currently, the form contains a placeholder YOUR_FORM_ID. You replace this with your own form endpoint later in this tutorial.
The useForm hook returns a state object and a handleSubmit function which you pass to the onSubmit form attribute. Combined, these provide a way to submit the form data via AJAX and update form state depending on the response received.
For clarity, this form does not include any styling, but in the GitHub project ( https://github.com/formspree/formspree-example-cloudflare-react) you can review an example of how to apply styles to the form.
To add this form to your website, import the component:
import ContactForm from './ContactForm';
Then insert the form into the page as a react component:
<ContactForm />
For example, you can update your src/App.js file to add the form:
import ContactForm from './ContactForm'; // <-- import the form component
import logo from './logo.svg';
import './App.css';

function App() {  return (    <div className="App">      <header className="App-header">        <img src={logo} className="App-logo" alt="logo" />        <p>          Edit <code>src/App.js</code> and save to reload.        </p>        <a          className="App-link"          href="https://reactjs.org"          target="_blank"          rel="noopener noreferrer"        >          Learn React        </a>
        {/* your contact form component goes here */}        <ContactForm />      </header>    </div>  );
}

export default App;
Now you have a single-page application containing a Contact Us form with several fields for the user to fill out. However, you have not set up the form to submit to a valid form endpoint yet. You will do that in the next section.
The Formspree back end
The React form is complete, however, when the user submits this form, they will get a Form not found error. To fix this, create a new Formspree form, and copy its unique ID into the form’s useForm invocation.
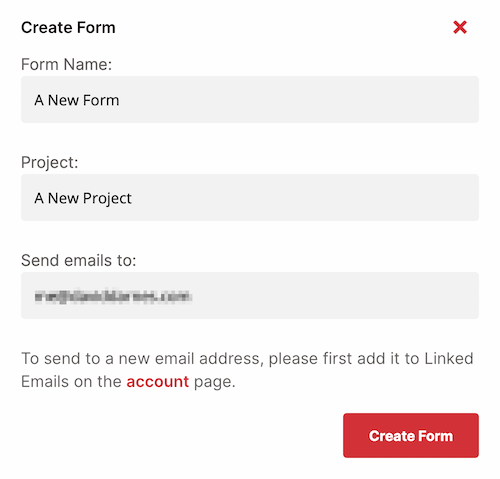
To create a Formspree form, sign up for an account on Formspree. Then create a new form with the + New form button. Name your new form Contact-us form and update the recipient email to an email where you wish to receive your form submissions. Finally, select Create Form.

You will be presented with instructions on how to integrate your new form. Copy the form’s hashid (the last 8 alphanumeric characters from the URL) and paste it into the useForm function in the ContactForm component you created above.

Your component should now have a line like this:
const [state, handleSubmit] = useForm('mqldaqwx');

/* replace the random-like string above with your own form's ID */
Now when you submit your form, you should be shown a Thank You message. The form data will be submitted to your account on Formspree.io.
From here you can adjust your form processing logic to update the notification email address, or add plugins like Google Sheets, Slack, and more.
For more help setting up Formspree, refer to the following resources:
- For general help with Formspree, refer to the Formspree help site.
- For more help creating forms in React, refer to the formspree-react documentation
- For tips on integrating Formspree with popular platforms like Next.js, Gatsby and Eleventy, refer to the Formspree guides.
Deployment
You are now ready to deploy your project.
If you have not already done so, save your progress within git and then push the commit(s) to the GitHub repository:
# Add all files
$ git add -A
# Commit w/ message
$ git commit -m "working example"
# Push commit(s) to remote
$ git push -u origin main
Your work now resides within the GitHub repository, which means that Pages is able to access it too.
If this is your first Cloudflare Pages project, refer to the Get started guide for a complete walkthrough. After selecting the appropriate GitHub repository, you must configure your project with the following build settings:
- Project name – Your choice
- Production branch –
main - Framework preset – Create React App
- Build command –
npm run build - Build output directory –
build
After selecting Save and Deploy, your Pages project will begin its first deployment. When successful, you will be presented with a unique *.pages.dev subdomain and a link to your live demo.
Using environment variables with forms
Sometimes it is helpful to set up two forms, one for development, and one for production. That way you can develop and test your form without corrupting your production dataset, or sending test notifications to clients.
To set up production and development forms first create a second form in Formspree. Name this form Contact Us Testing, and note the form’s hashid.
Then change the useForm hook in your ContactForm.js file so that it is initialized with an environment variable, rather than a string:
const [state, handleSubmit] = useForm(process.env.REACT_APP_FORM_ID);
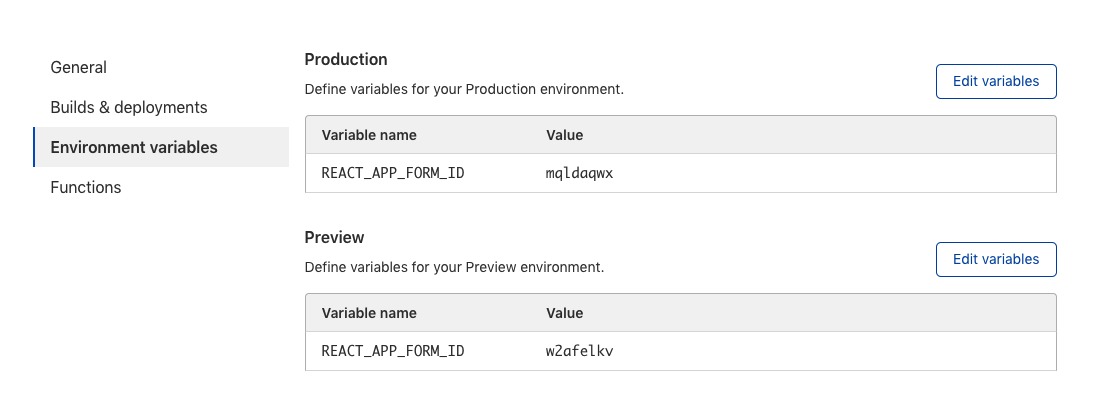
In your Cloudflare Pages project settings, add the REACT_APP_FORM_ID environment variable to both the Production and Preview environments. Use your original form’s hashid for Production, and the new test form’s hashid for the Preview environment:

Now, when you commit and push changes to a branch of your git repository, a new preview app will be created with a form that submits to the test form URL. However, your production website will continue to submit to the original form URL.
In this tutorial, you built and deployed a website using Cloudflare Pages and Formspree to handle form submissions. You created a React application with a form that communicates with Formspree to process and store submission requests and send notifications.
If you would like to review the full source code for this application, you can find it on GitHub.